
There are a number of ways to apply wood veneer to a substrate. If you prefer a fast, convenient method that doesn’t require specialized equipment, good results can be achieved with contact cement and a few hand tools. With the right approach, the process is surprisingly simple.
Preparing the Veneer and Substrate
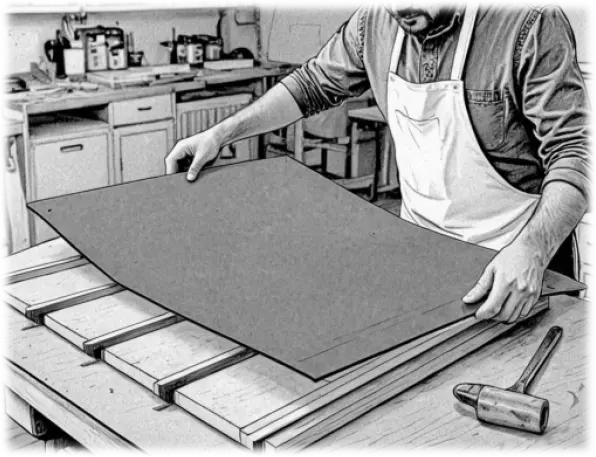
To begin, select the section of veneer you want to use. In most cases, it’s best to cut your substrate to its finished size beforehand. This way, you can trim the veneer afterward without risking damage by cutting the entire finished piece with a table saw. Position the most attractive area of the veneer pattern at the center of the substrate. Since contact cement bonds instantly, careful placement is crucial.
One effective way to ensure accurate placement is by creating a “window” from a piece of cardboard that matches the substrate’s dimensions. Place the substrate panel on top of the cardboard, trace its outline, and cut out the center. This allows you to position the cardboard window over the veneer, helping you visualize and mark the section you want. Once marked, trim the veneer about 1/2″ larger than needed to allow for precise alignment and trimming later.
Applying the Contact Cement
Following the manufacturer’s instructions, apply contact cement to both the veneer and the substrate, allowing it to set as directed. Contact cement has the advantage of preventing slippage once the pieces touch, but this also means precise placement is essential from the start.
To aid in positioning, use waxed paper as a temporary barrier. Place a sheet of waxed paper between the veneer and substrate, ensuring it extends slightly beyond one edge for easy removal. You can also lay several strips of wood (or dowels) on the substrate. Align the veneer over the panel, then slowly pull out the waxed paper (or wood strips/dowels) while keeping the veneer steady. This method allows for controlled placement, reducing the risk of misalignment.
Securing the Veneer
Once the veneer is in place, use a veneer roller to press it down firmly, starting from the center and working outward to the edges. This helps to eliminate air pockets and ensure a strong bond. After rolling, go over the surface with a smoothing blade to reinforce adhesion.
Run your hand over the veneer to check for trapped air bubbles. If you detect any, lightly tap the area—higher-pitched sounds indicate air pockets. Roll down these areas again with the smoothing blade. For stubborn bubbles, carefully slice along the grain with a razor knife to release the trapped air before pressing the veneer back down.
Trimming and Finishing
Turn the workpiece upside down on a cutting surface and trim the excess veneer using a razor knife, guiding it along the substrate’s edges. Begin with light scoring strokes to establish a clean cut before applying more pressure. Finally, allow the adhesive to cure fully, following the manufacturer’s recommendations, before applying any finish.
With these steps, you can achieve a professional-looking veneer application using simple tools and contact cement, creating a smooth and durable surface for your woodworking projects.
Final Thoughts
Applying wood veneer with contact cement is a straightforward and effective method that requires minimal tools while delivering professional results. By carefully selecting and positioning your veneer, using waxed paper for precise alignment, and ensuring a strong bond with a veneer roller and smoothing blade, you can achieve a flawless finish. With attention to detail and patience, even complex veneer patterns like maple burl or Macassar ebony can be successfully applied, enhancing your woodworking projects with a refined, high-end appearance.

