
Cauls are an essential tool for woodworking projects like gluing panels, applying edge banding, or any situation where you need even pressure over a surface. They reduce the number of clamps you need and help you clamp beyond the reach of standard clamps.
A caul can be as simple as a straight, sturdy piece of wood or a custom-made tool designed for a specific clamping task. However, the effectiveness of a caul depends on how it’s made and used. Homemade cauls, often made from leftover lumber, can sometimes be unreliable, which is why cauls are often overlooked in the workshop.
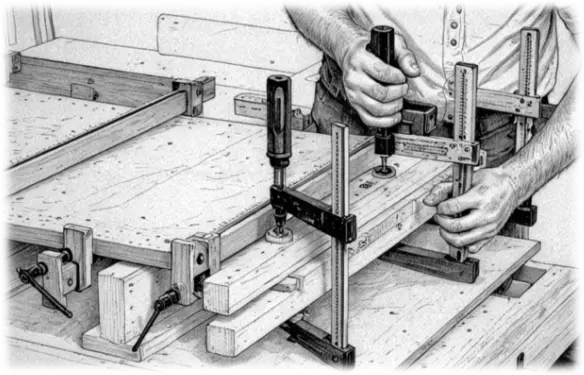
Tip: For consistent results, consider investing in manufactured cauls designed for professional glue-ups.
The Basics of a Caul
To distribute pressure evenly without damaging your work, a caul needs to be the right size and have the right shape.
- Size: The caul should be wide enough to spread the pressure and not dent the surface. A good rule of thumb is to use a caul that’s at least 1 inch wide and matches the length of the glued surface. For example, don’t use a 4-foot caul for a 2-foot project.
- Shape: A straight caul isn’t ideal. A slight curve or bow in the caul, called a “crown,” helps distribute pressure evenly. When clamping, the pressure starts in the middle and spreads out as the ends are tightened.
Dimensional lumber, like 2x4s, often has a natural crown due to humidity and temperature changes, making it easy to prepare for use as a caul. If you intentionally create the curve, the caul is called a “cambered caul.”
How to Make a Cambered Caul
For woodworkers who want to make their own cauls, creating a cambered shape is simple and effective:
2. Use a hand plane, belt sander, or even a block plane to shave down the edges gradually, leaving the middle slightly thicker.
3. Aim for a curve that’s subtle but visible when you sight down the length of the board—a bow of 1/16” to 1/8” is usually sufficient.
4. Sand smooth to prevent splinters or uneven pressure on your workpiece.
If you prefer precision, you can use a template to guide the curve—a simple arc traced onto the board can ensure uniformity.
Choosing Caul Material
The wood you use for a caul depends on your project:
- Hardness: If the caul is harder than the workpiece, it could dent the surface.
- Strength: The caul needs to withstand the pressure of clamping.
Good choices include maple or poplar for hardwood cauls and spruce for softwood cauls. For long-term use, consider sealing the cauls with varnish to protect them from moisture and wear.
Using Cauls
Cauls aren’t for pulling pieces together with heavy force. Their job is to distribute pressure evenly while reducing the number of clamps needed. Here are three common uses:
1. Edge Banding
Using cauls for edge banding can save you from using dozens of clamps. A caul with a slight crown allows you to secure the banding with just two clamps. If the caul is straight, you may need a third clamp in the middle. This method also prevents damage to the edges caused by clamps.
2. Panel Glue-Ups
Cauls are great for keeping panels flat during glue-ups. If you’re working on a flat surface, use cauls on the top to counteract the springing effect of edge clamps. If you don’t have a flat surface that allows clamps underneath, pair cauls on both sides of the panel to sandwich it flat while edge clamps apply pressure.
3. Cabinet Cases
For cabinet joints, whether butt or dado, cauls help apply even pressure across the joint. This prevents bowing, ensures glue spreads evenly, and keeps the cabinet square.
Pro Tip: To prevent cauls from sticking to glue squeeze-out, cover the faces with packing tape or use wax paper between the caul and your project.
Common Mistakes to Avoid
Avoid these pitfalls to ensure your cauls are effective:
- Too Narrow: A caul that’s too narrow won’t distribute pressure evenly, leading to dents or uneven glue lines.
- Over-Tightening Clamps: Cauls are meant to apply even pressure, not force parts together. Over-tightening can deform your project or break the caul.
- Ignoring Proper Placement: Ensure the caul’s crown is positioned correctly for the glue-up. Improper placement can make the pressure uneven.
Advanced Options: Manufactured Cauls and Features
If you’re ready to invest in more advanced tools, consider manufactured cauls:
- Adjustable Cauls: Some cauls come with threaded rods or tensioning systems to fine-tune pressure.
- Padded Cauls: Built-in padding prevents surface damage while ensuring even pressure.
- Non-Stick Coatings: Some commercial cauls feature non-stick surfaces to resist glue buildup.
Examples of Projects That Benefit from Cauls
Cauls are versatile tools for various woodworking projects, including:
- Laminating curved pieces (e.g., bending plywood).
- Flattening large tabletops during glue-ups.
- Clamping irregular shapes that require even pressure across uneven surfaces.
Conclusion
Cauls may seem like a simple tool, but their impact on your woodworking projects can be significant. By distributing pressure evenly, reducing the number of clamps needed, and ensuring a better-quality glue-up, cauls make your work more efficient and professional. Whether you choose to make your own or invest in manufactured options, understanding how to use cauls effectively will elevate your woodworking skills. Don’t overlook this valuable addition to your workshop — it’s a small tool that makes a big difference.

